Getting Started with git and GitHub.com

My very first commit to Github.com was on May 27th, 2020. GitHub technically counts it as a commit, but I was using the GitHub file upload feature so wasn’t really learning the fundamentals of git. Since then, I’ve pushed over 900 (mostly command line) commits to GitHub. I’ve had a few insights over all those commits and wanted to share a few here.
When you create a new repo, GitHub offers some helper commands to get you started -

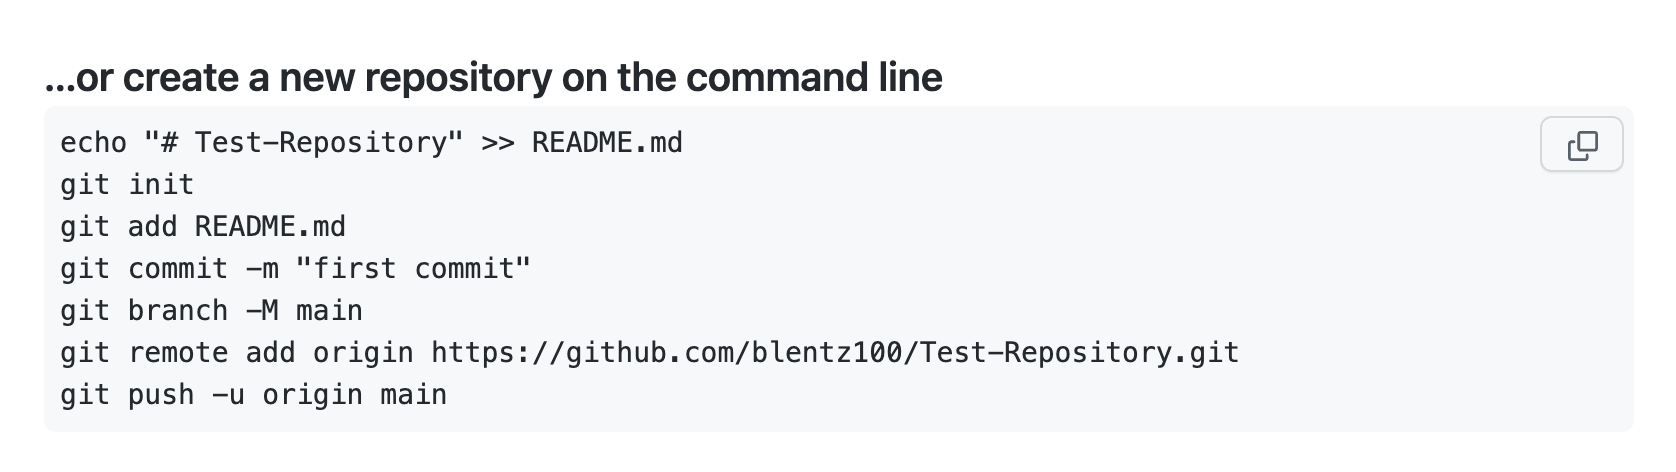
But it doesn’t explain what each command does. Let’s examine each step in more detail. At each step I’ll show you the real output on my own terminal of each command. If you are new to the command line, one important thing to note is that when you run a command and it works successfully, you won’t always get a response back telling you it worked or was successful. When you are learning, it’s helpful in those cases to know some other commands you can run to verify that the prior command worked as intended. In some spots below, I’m showing some optional commands you can and should run to get a better understanding of what’s happening.
Step 1 - Create a new file with echo
echo "# Test-Repository" >> README.md
➜  TestRepo ls -al
total 0
drwxr-xr-x   2 blentz  staff   64 Jul  8 16:01 .
drwxr-xr-x@ 20 blentz  staff  640 Jul  8 14:52 ..
➜  TestRepo echo "# Test-Repository" >> README.md
➜  TestRepo ls -al
total 8
drwxr-xr-x   3 blentz  staff   96 Jul  8 16:01 .
drwxr-xr-x@ 20 blentz  staff  640 Jul  8 14:52 ..
-rw-r--r--   1 blentz  staff   18 Jul  8 16:01 README.md
➜  TestRepo
echo is a command line utility that will take some string as input and output
it somewhere else. You are combining the echo command with the
the redirect >> shell operator. In this case you are redirecting the string # Test-Repository to a file named README.md
This gives you some file to work with when you are just starting.
If you are new to working on the command line, don’t worry too much about things
like the echo command and the >> redirect operator. You’ll have time later
to learn more about those, for now stick with git. Onto step 2...
Step 2 - Initialize a git repo
git init
➜  TestRepo git init
Initialized empty Git repository in /Users/blentz/GithubRepos/TestRepo/.git/
➜  TestRepo git:(main) ✗ ls -al
total 8
drwxr-xr-x   4 blentz  staff  128 Jul  9 18:10 .
drwxr-xr-x@ 20 blentz  staff  640 Jul  8 14:52 ..
drwxr-xr-x   9 blentz  staff  288 Jul  9 18:10 .git
-rw-r--r--   1 blentz  staff   18 Jul  8 16:01 README.md
➜  TestRepo git:(main) ✗
The next step is to initialize the local git repo. When you run git commit,
git creates a hidden folder called .git in your current directory. This
folder containts all the settings and history that git needs to track changes
to your project. Without this folder, running any git commands will not have
any effect. For now you don’t need to go in there for basic git usages, but if
you want to come back later and do a deep dive check out out: what’s in your
git directory
Step 3 - Stage files for a commit
git add README.md
➜  TestRepo git:(main) ✗ git add README.md
➜  TestRepo git:(main) ✗ git status
On branch main

No commits yet

Changes to be committed:
  (use "git rm --cached <file>..." to unstage)
        new file:   README.md

➜  TestRepo git:(main) ✗
Next up you choose which files you want to get ready for a commit, or a snapshot
of your project at a specific point in time. In this example, you just have the
README.md file in your project, so you run git add README.md.
If you are new to the command line, you should know that many commands you input
will not give you any feedback at all if they were successful. So notice above
when I ran git add README.md there was no feedback. For that reason, I
recommend you run the command git status after every single git command. It
will give you some better context as to the state of the git repo, and in many
cases it will give you a suggestion of what to do next. So run git status
early and often!
Step 4 - Execute the commit
git commit -m "first commit"
➜  TestRepo git:(main) ✗ git commit -m "first commit"
[main (root-commit) 14690ab] first commit
 1 file changed, 1 insertion(+)
 create mode 100644 README.md
➜  TestRepo git:(main) git status
On branch main
nothing to commit, working tree clean
➜  TestRepo git:(main)
Now that you have staged README.md, you are ready to commit it. Every commit
must have a description. This message can be about a new feature you added or a
bug you fixed. In this case it’s our very first commit of the project, so we
give it a message of “first commit” using the -m flag. Further reading on this
topic: A note about Git Commit Messages
Step 5 - Set your branch
git branch -M main
➜  TestRepo git:(main) git branch -M main
➜  TestRepo git:(main) git status
On branch main
nothing to commit, working tree clean
➜  TestRepo git:(main)
Branches in git allow for multiple developers to work on different parts of the
same code base at the same time, and then merge the changes together later. For
now you probably are only working with one branch, and the popular convention is
to name that branch main. Github.com uses main as the default branch, and
Git uses master as the default branch name, This step makes sure both branches
are in sync. Run git status again to confirm your change took effect.
I have instructions here on how to make this a global setting so you don’t have to run it each time.
Step 6 - Connect to your remote
git remote add origin https://github.com/blentz100/Test-Repository.git
➜  TestRepo git:(main) git remote -v
➜  TestRepo git:(main) git remote add origin https://github.com/blentz100/Test-Repository.git
➜  TestRepo git:(main) git remote -v
origin  https://github.com/blentz100/Test-Repository.git (fetch)
origin  https://github.com/blentz100/Test-Repository.git (push)
➜  TestRepo git:(main)
Your remote is where you want to push your local changes to. In this case we
want our remote to be Github.com. Running git remote -v this first time shows
there are no remotes, and the second time it shows we’ve successfully added the
remote.
I’ve been asked before why this step is necessary. Shouldn’t git just know automatically that we want to connect our local repo with our repo on GitHub.com? It might be helpful to know that git has been around long before there was a GitHub.com. There are many other alternatives to GitHub.com you could use. Another use case is you might just want a local repository on your own machine to track changes for yourself.
Step 7 - Push to Github
git push -u origin main
➜  Test-Repository git:(main) git push -u origin main
Enumerating objects: 3, done.
Counting objects: 100% (3/3), done.
Writing objects: 100% (3/3), 250 bytes | 250.00 KiB/s, done.
Total 3 (delta 0), reused 0 (delta 0), pack-reused 0
To https://github.com/blentz100/Test-Repository.git
 * [new branch]      main -> main
Branch 'main' set up to track remote branch 'main' from 'origin'.
➜  Test-Repository git:(main) git status
On branch main
Your branch is up to date with 'origin/main'.

nothing to commit, working tree clean
➜  Test-Repository git:(main)
This last step takes takes the changes you committed locally and pushes them to
your repo on your remote (your repo on GitHub.com). You configured this remote
in step 6. The output you see here is similar to the output anytime you
successfully push your latest commit. If you do a push and don’t see the
familiar Enumerating objects, Counting Objects, Writing Objects then
something probably went wrong.
The -u origin main option only needs to be included the first time you run
this command. From here on out, git knows that your local branch main should
track with your remote branch main.